在开发中,我们经常碰到这样的控件,用来切换不同的Fragment

这种控件的实现的效果有多种多样,一般来说我们都是使用一个LinearLayout嵌套几个Button来实现,然后通过for循环来实现单一的选择。
虽然代码量不多,但对于我们这样有追求的人来说,是不会屑于使用方式了。因为android上已经有了个RadioGroup了,为毛还要写个for循环来控制单一的选择状态呢。
废话少说,直接上代码:
<RelativeLayout xmlns:android="http://schemas.android.com/apk/res/android"
xmlns:app="http://schemas.android.com/apk/res-auto"
xmlns:tools="http://schemas.android.com/tools"
android:layout_width="match_parent"
android:layout_height="match_parent"
app:layout_behavior="@string/appbar_scrolling_view_behavior"
tools:context="com.example.yuyu.navigationbardemo.MainActivity"
tools:showIn="@layout/activity_main">
<FrameLayout
android:id="@+id/content"
android:layout_width="match_parent"
android:layout_height="match_parent"
android:layout_above="@+id/navigation" />
<RadioGroup
android:id="@+id/navigation"
android:layout_width="match_parent"
android:layout_height="50dp"
android:layout_alignParentBottom="true"
android:background="@android:color/white"
android:orientation="horizontal">
<RadioButton
style="@style/MainRadioButtonStyle"
android:tag="0"
android:text="红色" />
<RadioButton
style="@style/MainRadioButtonStyle"
android:tag="1"
android:text="蓝色" />
<RadioButton
style="@style/MainRadioButtonStyle"
android:tag="2"
android:text="绿色" />
<RadioButton
style="@style/MainRadioButtonStyle"
android:tag="3"
android:text="黄色" />
</RadioGroup>
</RelativeLayout>
|
没啥好说的,这就一个简单的布局代码,要注意的是,在RadioButton里面我使用了自定义的风格。
这是RadioButton自定义风格,也没啥好说的
<style name="MainRadioButtonStyle">
        <item name="android:layout_marginTop">8dp</item>
        <item name="android:drawablePadding">2dp</item>
        <item name="android:layout_height">match_parent</item>
        <item name="android:layout_width">wrap_content</item>
        <item name="android:layout_marginBottom">5dp</item>
        <item name="android:textSize">12sp</item>
        <item name="android:layout_weight">1</item>
        <item name="android:button">@null</item>
        <item name="android:gravity">center</item>
        <item name="android:textColor">@drawable/selector_navigation_text_bg</item>
    </style>
|
同时为了能让被选择的字体变色,我们需要一个字体选择器和一个图标的选择器,选择器依然没什么好说的..
唯一需要注意的是:两个选择器的状态需要一致
字体颜色选择器:
<selector xmlns:android="http://schemas.android.com/apk/res/android">
    <item android:color="@color/colorPrimary" android:state_checked="true" />
    <item android:color="@android:color/black" android:state_checked="false" />
</selector>
|
图标选择器:
<selector xmlns:android="http://schemas.android.com/apk/res/android">
    <item android:drawable="@mipmap/icon_selected" android:state_checked="true" />
    <item android:drawable="@mipmap/icon_un_selected" android:state_checked="false" />
</selector>
|
布局文件什么的已经上完,是时候来搞java代码了,不废话,还是直接上java代码
public class MainActivity extends AppCompatActivity implements RadioGroup.OnCheckedChangeListener {
private String TAG = "MainActivity";
private RadioGroup mNavigationBar;
private FragmentManager mFm;
@Override
protected void onCreate(Bundle savedInstanceState) {
super.onCreate(savedInstanceState);
setContentView(R.layout.activity_main);
init();
}
private void init() {
mFm = getSupportFragmentManager();
mNavigationBar = (RadioGroup) findViewById(R.id.navigation);
int size = (int) getResources().getDimension(R.dimen.navigation_top_icon_size);
for (int i = 0, count = mNavigationBar.getChildCount(); i < count; i++) {
RadioButton rb = (RadioButton) mNavigationBar.getChildAt(i);
Drawable topIcon = getResources().getDrawable(R.drawable.selector_navigation_bg);
topIcon.setBounds(0, 0, size, size);
rb.setCompoundDrawables(null, topIcon, null, null);
rb.setId(i);
}
mNavigationBar.setOnCheckedChangeListener(this);
((RadioButton) mNavigationBar.getChildAt(0)).setChecked(true);
}
private void chooseFragment(String tag) {
int color = Color.RED;
switch (tag) {
case "0":
color = Color.RED;
break;
case "1":
color = Color.BLUE;
break;
case "2":
color = Color.GREEN;
break;
case "3":
color = Color.YELLOW;
break;
}
Fragment fragment = DummyFragment.newInstance(color);
FragmentTransaction ft = mFm.beginTransaction();
ft.replace(R.id.content, fragment);
ft.commit();
}
@Override
public void onCheckedChanged(RadioGroup group, int checkedId) {
RadioButton rb = (RadioButton) group.getChildAt(checkedId);
if (rb.isChecked()) {
chooseFragment(String.valueOf(rb.getTag()));
}
}
@SuppressLint("ValidFragment")
public static class DummyFragment extends Fragment {
int color;
public static DummyFragment newInstance(@ColorInt int color) {
return new DummyFragment(color);
}
private DummyFragment() {
}
private DummyFragment(int color) {
this.color = color;
}
@Override
public View onCreateView(LayoutInflater inflater, ViewGroup container, Bundle savedInstanceState) {
View view = inflater.inflate(R.layout.test_game_detail_fragment, container, false);
view.setBackgroundColor(color);
return view;
}
}
}
|
简单吧,这就是全部的控制代码了,虽然有几十行,但是核心的代码也就那么几行,核心方法就是onCheckedChanged回调函数,在最开始初始化控件的时候,我们按照排列顺序依次给没一个RadioButton设置了递增的id,所以在RadioGroup被选中时,便可以直接获取到被点中的子控件。
这里还有个坑需要注意!!!
那便是设置图标的时候,不能直接把下面这代码提到循环外
Drawable topIcon = getResources().getDrawable(R.drawable.selector_navigation_bg);
|
如果提到循环外,那他便是一个局部变量,会同时被所有RadioButton共用,到时候进行状态选择时,图标的状态将完全混乱!!
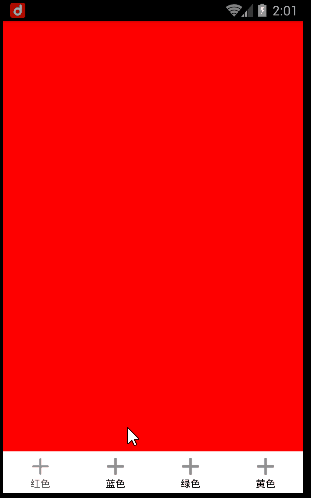
好了,最后是效果图:

最后的最后便是源代码快,点击我